How to CPI in a Solana program
This guide uses the Anchor framework to demonstrate how to transfer SOL using a Cross Program Invocation (CPI). Included below are three different, but functionally equivalent implementations that you may come across when reading or writing Solana programs. Here is a final reference program on Solana Playground.
Starter Code
Here is a starter program on
Solana Playground.
The lib.rs file includes the following program with a single sol_transfer
instruction.
use anchor_lang::prelude::*;
use anchor_lang::system_program::{transfer, Transfer};

declare_id!("9AvUNHjxscdkiKQ8tUn12QCMXtcnbR9BVGq3ULNzFMRi");

#[program]
pub mod cpi {
    use super::*;

    pub fn sol_transfer(ctx: Context<SolTransfer>, amount: u64) -> Result<()> {
        let from_pubkey = ctx.accounts.sender.to_account_info();
        let to_pubkey = ctx.accounts.recipient.to_account_info();
        let program_id = ctx.accounts.system_program.to_account_info();

        let cpi_context = CpiContext::new(
            program_id,
            Transfer {
                from: from_pubkey,
                to: to_pubkey,
            },
        );

        transfer(cpi_context, amount)?;
        Ok(())
    }
}

#[derive(Accounts)]
pub struct SolTransfer<'info> {
    #[account(mut)]
    sender: Signer<'info>,
    #[account(mut)]
    recipient: SystemAccount<'info>,
    system_program: Program<'info, System>,
}
The cpi.test.ts file demonstrates how to invoke the custom sol_transfer
instruction and logs a link to the transaction details on SolanaFM.
it("SOL Transfer Anchor", async () => {
  const transactionSignature = await program.methods
    .solTransfer(new BN(transferAmount))
    .accounts({
      sender: sender.publicKey,
      recipient: recipient.publicKey,
    })
    .rpc();

  console.log(
    `\nTransaction Signature:` +
      `https://solana.fm/tx/${transactionSignature}?cluster=devnet-solana`,
  );
});
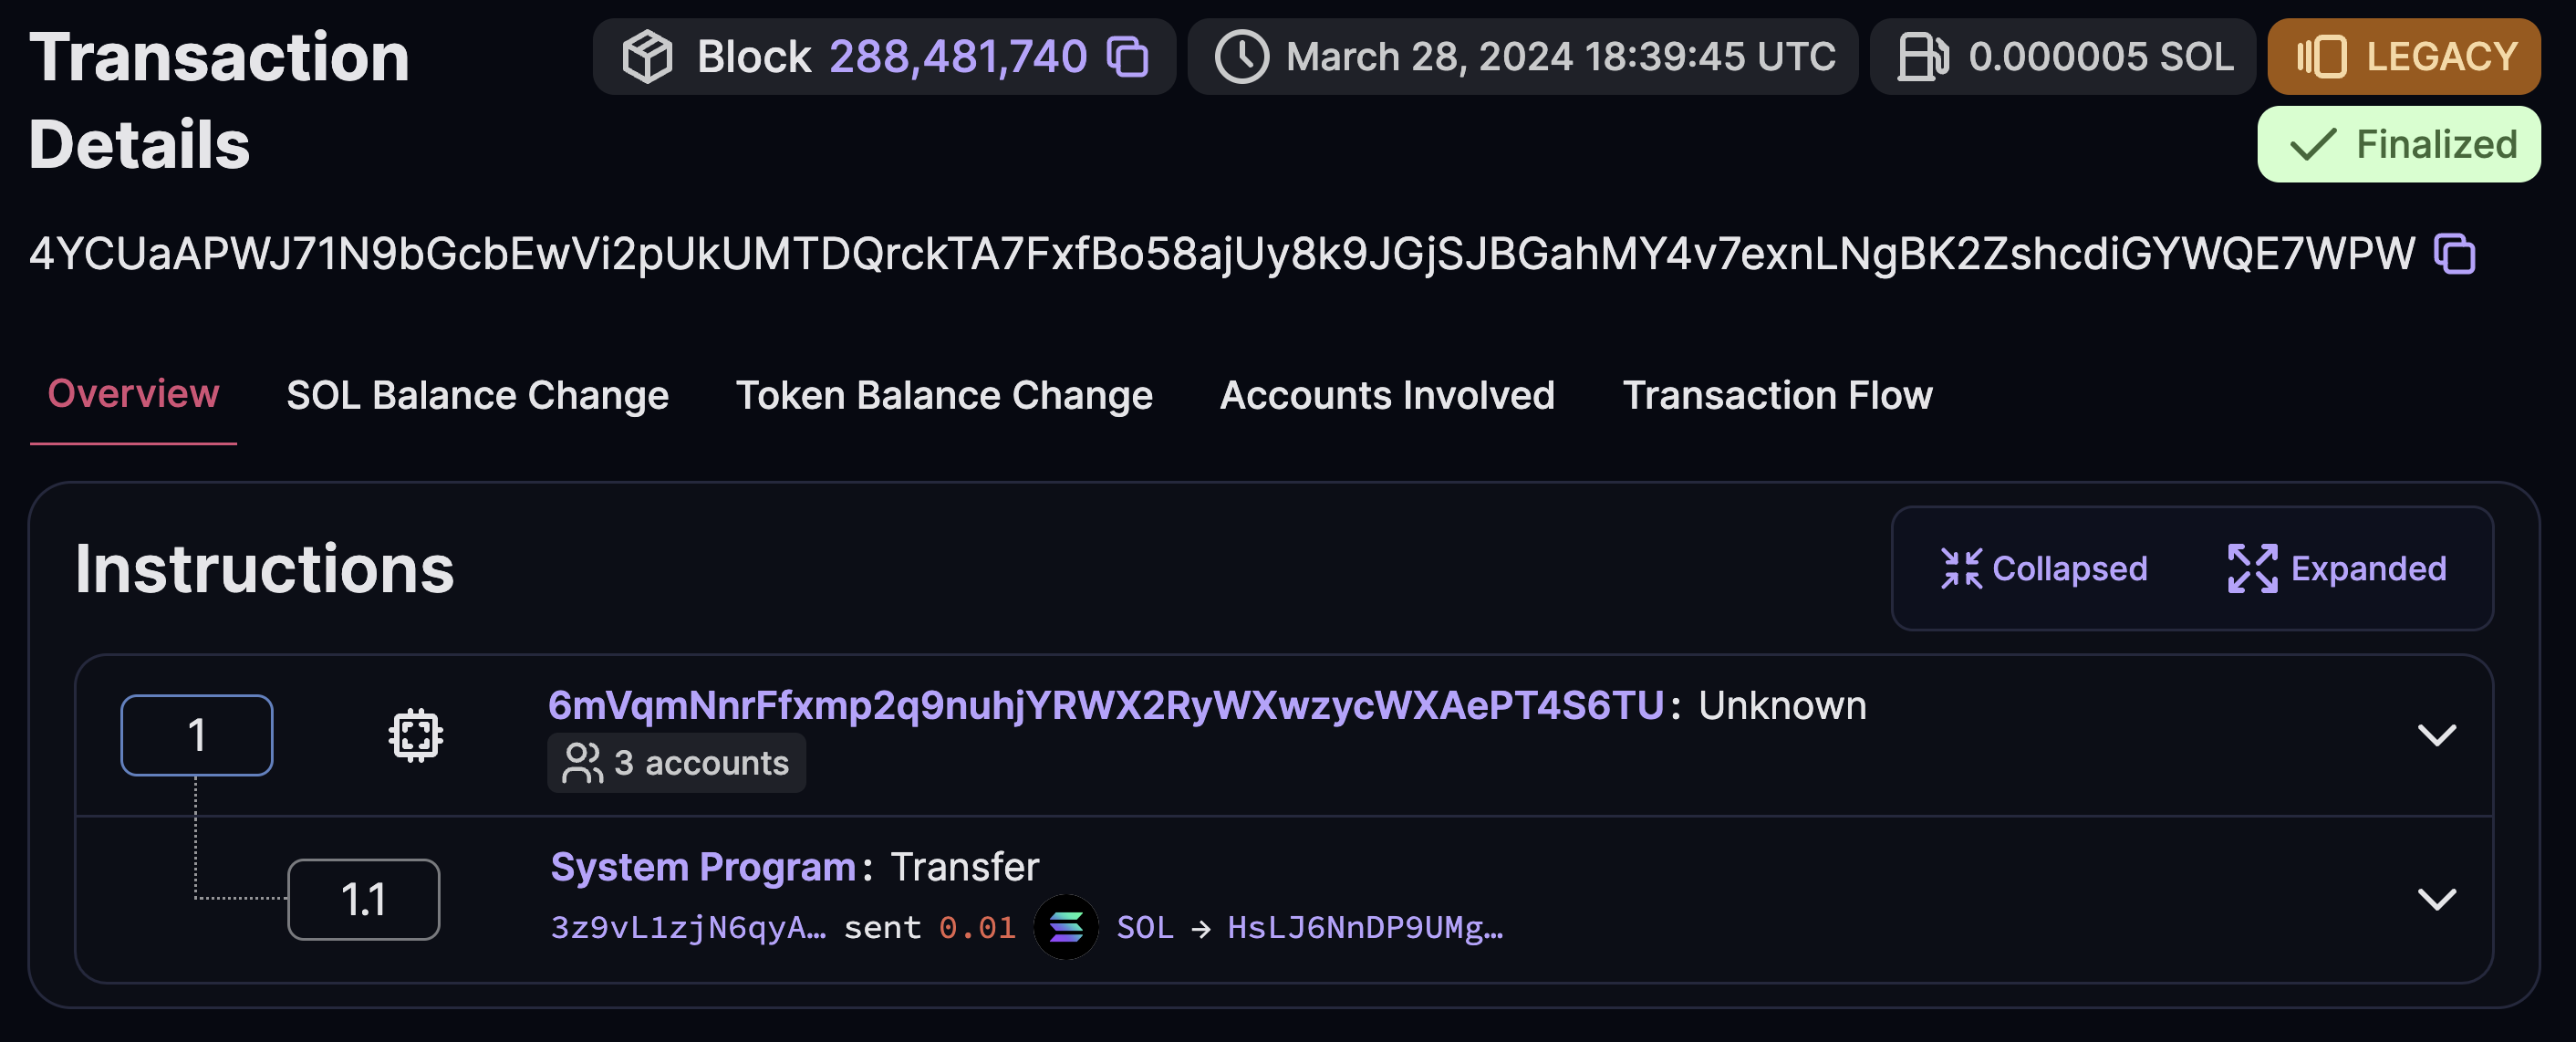
The transaction details will show that the custom program was first invoked (instruction 1), which then invokes the System Program (instruction 1.1), resulting in a successful SOL transfer.

You can build, deploy, and run the test of this example on Playground to view the transaction details on the SolanaFM explorer.
How to CPI with Anchor
In the starter code, the SolTransfer struct specifies the accounts required by
the transfer instruction.
#[derive(Accounts)]
pub struct SolTransfer<'info> {
    #[account(mut)]
    sender: Signer<'info>,
    #[account(mut)]
    recipient: SystemAccount<'info>,
    system_program: Program<'info, System>,
}
Anchor CpiContext
The sol_transfer instruction included in the starter code shows a typical
approach for constructing CPIs using the
Anchor framework.
This approach involves creating a
CpiContext,
which includes the program_id and accounts required for the instruction being
called, followed by a helper function (transfer) to invoke a specific
instruction.
use anchor_lang::system_program::{transfer, Transfer};
pub fn sol_transfer(ctx: Context<SolTransfer>, amount: u64) -> Result<()> {
    let from_pubkey = ctx.accounts.sender.to_account_info();
    let to_pubkey = ctx.accounts.recipient.to_account_info();
    let program_id = ctx.accounts.system_program.to_account_info();

    let cpi_context = CpiContext::new(
        program_id,
        Transfer {
            from: from_pubkey,
            to: to_pubkey,
        },
    );

    transfer(cpi_context, amount)?;
    Ok(())
}
The cpi_context variable specifies the program ID (System Program) and
accounts (sender and recipient) required by the transfer instruction.
let cpi_context = CpiContext::new(
    program_id,
    Transfer {
        from: from_pubkey,
        to: to_pubkey,
    },
);
The cpi_context and amount are then passed into the transfer function to
execute the CPI.
transfer(cpi_context, amount)?;
Invoke with Crate Helper
Under the hood, the CpiContext example above is a wrapper around the
solana_program crate's invoke function which uses
system_instruction::transfer
to build the instruction.
The example below demonstrates how to use the invoke() function to make a CPI
to the transfer instruction of the System Program using the
system_instruction::transfer method.
First, add these imports to the top of lib.rs:
use anchor_lang::solana_program::{program::invoke, system_instruction};
Next, modify the sol_transfer instruction with the following:
pub fn sol_transfer(ctx: Context<SolTransfer>, amount: u64) -> Result<()> {
    let from_pubkey = ctx.accounts.sender.to_account_info();
    let to_pubkey = ctx.accounts.recipient.to_account_info();
    let program_id = ctx.accounts.system_program.to_account_info();

    let instruction =
        &system_instruction::transfer(&from_pubkey.key(), &to_pubkey.key(), amount);

    invoke(instruction, &[from_pubkey, to_pubkey, program_id])?;
    Ok(())
}
This implementation is functionally equivalent to the previous example.
Invoke with Instruction
You can also manually build the instruction to pass into the invoke()
function. This is useful when there is not a crate available to help build the
instruction you want to invoke.
This approach requires you to manually specify the AccountMetas required by
the instruction and correctly create the instruction data buffer.
The sol_transfer instruction below is a fully expanded equivalent of the
previous two examples.
pub fn sol_transfer(ctx: Context<SolTransfer>, amount: u64) -> Result<()> {
    let from_pubkey = ctx.accounts.sender.to_account_info();
    let to_pubkey = ctx.accounts.recipient.to_account_info();
    let program_id = ctx.accounts.system_program.to_account_info();

    // Prepare instruction AccountMetas
    let account_metas = vec![
        AccountMeta::new(from_pubkey.key(), true),
        AccountMeta::new(to_pubkey.key(), false),
    ];

    // SOL transfer instruction discriminator
    let instruction_discriminator: u32 = 2;

    // Prepare instruction data
    let mut instruction_data = Vec::with_capacity(4 + 8);
    instruction_data.extend_from_slice(&instruction_discriminator.to_le_bytes());
    instruction_data.extend_from_slice(&amount.to_le_bytes());

    // Create instruction
    let instruction = Instruction {
        program_id: program_id.key(),
        accounts: account_metas,
        data: instruction_data,
    };

    // Invoke instruction
    invoke(&instruction, &[from_pubkey, to_pubkey, program_id])?;
    Ok(())
}
The sol_transfer instruction above replicates this
example of manually building a
SOL transfer instruction. It follows the same pattern as building an
instruction to add to a transaction.
When building an instruction in Rust, use the following syntax to specify the
AccountMeta for each account:
AccountMeta::new(account1_pubkey, true),           // writable, signer
AccountMeta::new(account2_pubkey, false),          // writable, not signer
AccountMeta::new_readonly(account3_pubkey, false), // not writable, not signer
AccountMeta::new_readonly(account4_pubkey, true),  // writable, signer